 |
|
| Granada Disc Brakes |
Last Revised: 9 December 2001 |
|
|
| Granada Disc Brakes |
Last Revised: 9 December 2001 |
 |
The Granada Disc Brake swap seems
to be the most popular, economical method of adding the safety and
reliability of disc brakes to an early Mustang. The mod is relative
simple and all parts are readily available between auto salvage parts and
new parts from your local parts store.
Special Credit goes to MustangSteve for his help when I was doing my installation. Much, if not all of the information here was derived from either straight up instructions or posted conversation threads from the FYI-Ford MustangSteve Message Board. Consider this page under one big quotation mark....... |
Simply put...safety. Disc Brakes may or may not stop you shorter than regular self-energizing front drums. However, front discs provide for better cooling, longevity, and ease of maintenance. The Granada swap, when combined with a dual master cylinder and a pressure sensing distribution block, provides a modern braking configuration, allowing one circuit to work if pressure is lost in the other. With this mod, you won't lose ALL your brakes, like you can with the factory single reservoir system. Besides.... gleaming rotors staring out of those aftermarket wheels looks cool.......
![]()
| Ford Granadas and Mercury Monarchs produced between '75 and '80 offer the best opportunity for transplant. All the parts from the spindles out are interchangeable during this time frame. This photo shows all the elements of the Ford single caliper disc brakes which came equipped on these model cars. You can opt to take the whole assembly out of the donor and bolt up to your ball joints, or you can go to the other extreme, using just the spindles, dust shields and caliper mounts, and buy everything else new from an Auto store. Or...anywhere in between. | 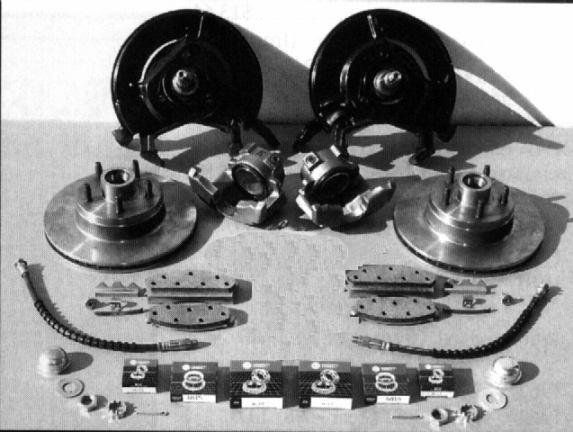 |
![]()
First stop..... your local wrecking yard. Preferable a 'pick-n-pull' type yard, as they will be cheaper and you get to spend more time making your choices. First choice of course is an operational car..... one that still had fluid in the system. This gets you calipers and lines that work, plus a good distribution block. If you can't find the perfect donor, keep looking. There are lots of Granadas and Monarchs build between 75 and 80.
| Pull the unit at the ball joints (beating on the A-Frame arms, not the Spindles.) MustangSteve has a handy-Dandy ball joint breaker if you're interested. | |
| Cut the steel brake lines past the flex lines with a pair of dikes, pinching them closed and keeping them full of fluid. You can break the fittings off at home later. | |
| Take the outer tie-rods and sleeves. They may be worth using, and shouldn't cost any extra if they aren't. | |
| Oh... by the way, if you don't have 5 bolt wheels, now's a good time to find some cheapies to get you around till you can afford those 10 spoke Shelbys. | |
| Cut the 5 lines to the distribution block and take the whole assembly. Try to keep the fluid in it to keep the o-rings wet. | |
| The most important parts are the spindles, dust shield, and caliper attach bracket. Everything else can be bought from a parts house if need be. |
Remember, junk yards get paid the same if it's a good part or bad. And if you take home a bad part, then you will have a hard time taking it back and swapping. Also, get all your parts at one time. You get a better deal for two complete spindles-out assemblies and the distribution block than you would a piece at a time. (Voice of experience...I had to go back and get the distribution block and it cost me plenty!)
If possible, take a few minutes before buying to pop the dust cap and check the bearings. Check for excessive play, which may be a sign of a worn rotor. (Again, voice of experience.... gouged and galled spindles are not a nice surprise.)
![]()
This list was compiled from various sources, so the prices are not absolutes. They are, however, fairly close and will give you a good place to make a call on what items you should try to salvage and which are not worth messing with. Also included are front end parts. If you're swapping a 6 to V-8, now's a good time to change the steering linkage too.
| Source | Part Number | Qty | Description | Unit Price | Total |
| Western Auto | S13 | 2 | 77 Granada inner wheel bearings | $5.99 | $11.98 |
| AutoZone | 693226 | 2 | 77 Granada outer wheel bearings | $6.97 | $13.94 |
| Western Auto | 71-19221 | 2 | 77 Granada Wheel Seals | $1.89 | $3.78 |
| Salvage yard | N/A | 2 | 77 Granada Spindles (with backing plates and calipers for core charge) | $30.00 | $60.00 |
| AutoZone | 561720 | 2 | 77 Granada brake rotors | $32.99 | $65.98 |
| Western Auto | 18-4069/18-4070 | 2 | 77 Granada brake calipers | $12.99 | $25.98 |
| AutoZone | 88519 | 2 | 77 Granada brake hoses | $9.99 | $19.98 |
| Western Auto | RR-D91 | 1 | 77 Granada brake pads | $12.99 | $12.99 |
| Plaza Auto Parts | 258340 | 2 | Brake hose adapters | $1.82 | $3.64 |
| AutoZone | 2 | Spindle Nut/Retainer/Cotter/Dust Cap | $4.50 | $9.00 | |
| AutoZone | 10-1588 | 1 | 74 Maverick M/C Nonpower disc/drum | $28.63 +$5 Core | $33.63 |
| AutoZone | 1 | Antirattle clips (2 to a pack) | $1.65 | $1.65 | |
| Salvage Yard | 1 | Distribution Block | $20.00 | $20.00 | |
| Brake Swap Cost | $287.55 | ||||
| Mustangs Unlimited | C5ZZ3590ARS 01 | 1 | Idler arm and Pitman arm (GT-350 kit) | $119.95 | $119.95 |
| Dallas Mustang | 1431 | 1 | Center (drag) link | $96.28 | $96.28 |
| AutoZone | SL77 | 1 | Stabilizer end link kit | $6.94 | $6.94 |
| AutoZone | 2 | 77 Grenada outer tie rod ends | $31.00 | $62.00 | |
| Salvage yard | N/A | 2 | 5 lug rims (14 inch) | $10.00 | $20.00 |
![]()
What to do...what to do...? Should I use as much as possible or build up from new? It all depends on the shape of the items you came home from the salvage yard with. Rotors only cost 6 bucks to have turned, but if they are factory originals and are close to their wear limits, then you're better off spending the extra $25 or so. Calipers can have frozen pistons, or can leak if they've been on a junk car too long. The cost of rebuilding them yourself is about $8 less than getting fresh ones from the store. Flex brake lines can rot and crack, but may still be good. It's always wise to remove and replace the inner and outer bearings.
![]()
Rule of the day: SAFETY! You are working with a 'safety of flight item' for your car. It is mandatory that this be done correctly and safely. You will be putting yourself at risk by working under the car. You will be driving at high speeds and will have passengers in your car, as well as ME in the oncoming traffic lane. Do not attempt this if you are not completely comfortable in your knowledge of vehicle maintenance. I ASSUME NO RESPONSIBILITY FOR WHAT IS PROVIDED HERE. THIS SITE IS FOR INFORMATION PURPOSES ONLY. DO THIS MOD AT YOUR OWN RISK! (Have I left out any other disclaimers?) All kidding aside, this is not swapping headlights or steering wheels....this is SERIOUS SAFETY stuff.
| Shock Absorber Upper Attachment: | 10-15 Ft Lbs |
| Shock Absorber Upper Bracket to Body: | 8-16 Ft Lbs |
| Shock Absorber to Spring Seat: | 12-17 Ft Lbs |
| Upper/Lower Ball Joint to Spindle: | 60-90 Ft Lbs |
| Tie Rod to Spindle: | 30-40 Ft Lbs |
Install new brake shoes; repack & re-torque the wheel
bearings. Don't forget the anti-rattle clips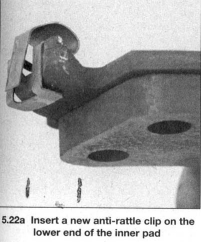 .
.
![]()
 |
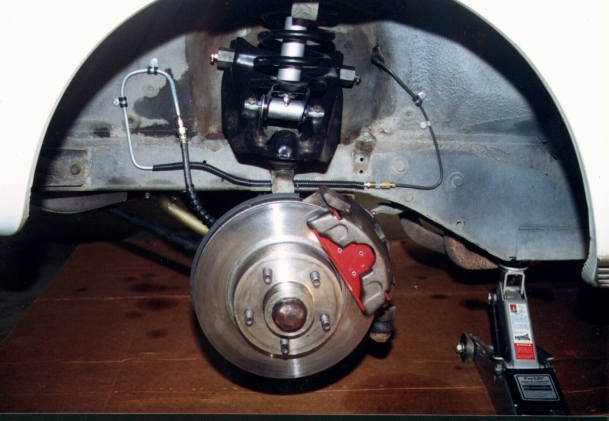
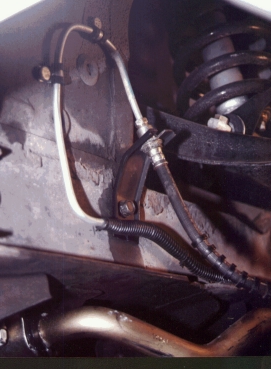
Granada calipers require that the
brake line be rerouted to the front of the assembly. This
necessitates an additional line picking up the existing brake line,
routing down the framerail, and positioning to pick up the Granada flex
hose.
|
| Posted by MustangSteve on 7/3/2001, 9:09 pm - Actually, the hard lines need to come along the frame rail to a point about 2" in front of the leading edge of the upper a-frame, than form a 1/2" radius 180 degree bend so it points backwards. The steel angle will be bolted to the frame to hold the end of the steel line at that point. the rubber hose then screws into the steel line at the bracket. The end of the rubber hose will be pointing FORWARD. | 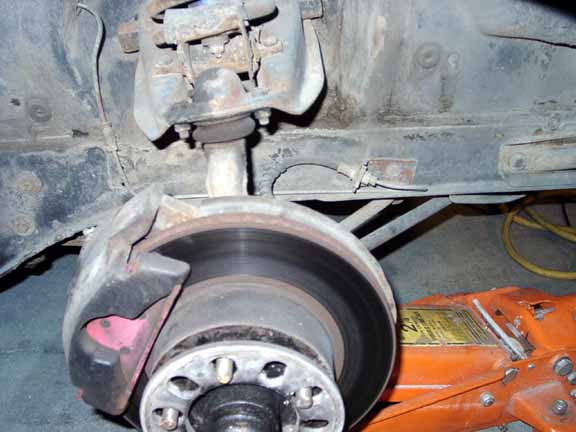 |
 |
Reply
Posted by
JamesW
on
7/5/2001, 8:31 pm -At
the time I did my brakes I had the spindles pulled at the wrecking yard
for me, so I never saw how the original lines routed. So, when I
installed them, I tried to place them where I felt the lines would be
least flexed through their range of motion. I tried all positions and
having the lines come in from the top seemed to be the best place to
reduce line flex.
The reason the lines are so long is because I bought pre-fabbed lines from Advanced Auto Parts that already had the necessary different size fittings installed. As they stand now, the lines are very secure and put very little strain on the hose. Peer pressure has finally gotten me to secure my hard lines. The photo to the right shows how I took the old brake line bracket, turned it 180... mounted upfront, and have not had any problem with it. Michael's Installation: Very clean |
![]()
Tie Rod must be from the Granada/Monarch, or other post-70 Ford such as a Mustang, Torino, etc. The
reason: the Tie Rod shaft hole on the Granada spindle is LARGER than the tie rod ball joint on the early
model Mustang. You must have a tapered tie rod bolt that fits the spindle. The threaded end of the tie rod
will screw into the original adjusting collar of a V-8 front end early model Mustang. Notice
I said V-8 front end Mustangs. I-6 Steering systems use a smaller tie rod
setup. MustangSteve sells an adaptor if you're so inclined to keep your
original tie rods. New tie rods are relatively cheap and worth the investment.
![]()
(The round dohicky above is for a T-5 Cable Clutch...) |
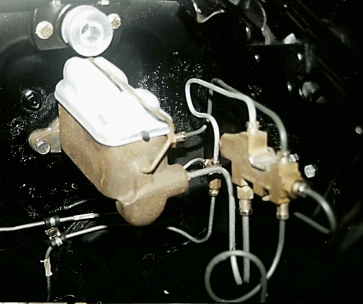
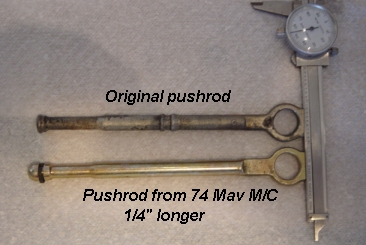
The master cylinder of choice is the
1974 Ford Maverick, with front disks, rear drums, and non power
assist. These M/Cs are inexpensive, are a direct bolt in, do not
require relocation of pedal connection, and already have the correct
1/4" fitting size. Follow included instructions and bench
bleed. The unit should fit your existing brake pedal configuration
with no modification.
Note: Use the original Pushrod.
|
![]()
| What size wheels do you use? 14"?....15"?... maybe even go all the way up to those cool 16"? You need at least 14" wheels made for disc brakes to clear the rotors. Even then, you may need to do a slight grind job on your calipers to clear styled steel wheels. Larger wheels do not have a disc/caliper clearance problem. |
![]()
Hooking up lines will invariably become your biggest headache. Besides lines between the M/C and the Distribution block, the connection between the distribution block and the existing brake lines will require some special lines. That is, unless you opt to fab complete new lines between the distribution block and the front / rear brake flex lines. (that's another topic).
There are two schools of thought on Brake lines. The 'wimp' camp, which says...go down to your local parts store and purchase pre-flared lines, bend them to fit, and connect via unions and adapters. The other camp, the 'I can flare' camp, which says, 'go get yourself a good inverted flaring kit, buy a roll of tubing and the various inverted flare fittings and make your own lines to fit your application.' Both have pros and cons. The Wimps have a little extra line to bend around into place, and cost a little more, but is the simplest and less likely to leak, where as the ICanFlares look more custom and are cheaper, but it takes practice to make good flares and when they leak, it's a real pain. Either is good, either works, some people do both. It's up to you. (pssst....be a wimp.)
![]()
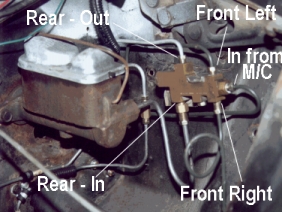 |
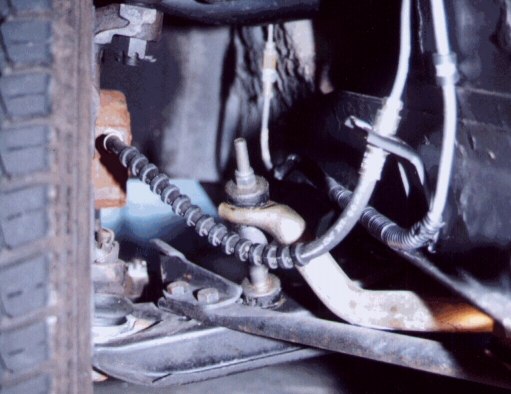
When you're getting the spindle assemblies at the
Salvage Yard, don't forget the distribution block. Most any post-1970 Ford
distribution block for dual circuit braking systems will work. The unit
has a pressure sensing diaphragm which, when detecting a pressure drop, will
close off fluid flow to the dropped circuit. This will allow you to still
have either front or back brakes. Take the connector and a partial strand
of the wiring, as you may wish to hook up a "Brake Warning" light
later.
When you get it home, you may want to disassemble and wash out with a bath of clean brake fluid and a toothbrush. Gunk from a sitting system will accumulate around the spring mechanism. Do not lose any parts, as these are dealer parts. Cap the ports when the unit is not hooked up. |
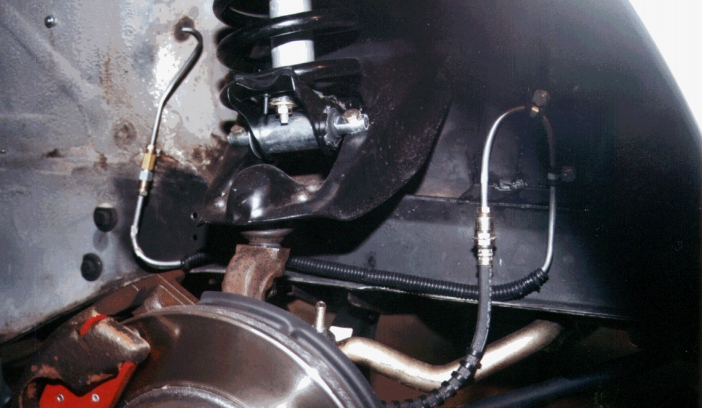
The block has 5 ports. It can be hung at any angle, preferably on the rear apron approximately where tne original was located. Hook up as follows: Front Left, Front Right, and the Front 'in' from rear M/C port are all interchangeable, and use the three ports that form the "T" on the front end of the distribution block (left side of block shown). Rear line goes to the next to back port. Rear 'in' from front M/C port goes to farest port back. This photo shows the M/C connection lines installed. |
 |
![]()
| The Granada rotors will not clear the center diameter of a factory Mustang Styled Steel Wheel. The Granada rotors are too large. Therefore, if you want to run these wheels, you'll need to have the rotor snouts turned down on a lathe by a machine shop. I don't know the exact size the bearing OD on the hub needs to be, but the correct answer is about .010" smaller than the wheel's center hole. Use the size of the original drum brake bearing OD. If you plan on using aftermarket wheels, no machining is required. | |
| You may also run into interference at the calipers. This may require a light grinding on the caliper to clear the wheel. |
![]()
| Use plenty of anti squeak lubricant. | |
| Brake noise, clicking: make some shims out of aluminum soft drink cans. Slip them onto the lip where the shoe mates to the caliper. This removes the play. | |
| Use a coat hanger for line protection. Wrap the coat hangar around the line like a spring...it will protect the line from chaffing and leaking. | |
| Mock up Brake lines using a clothes hangar. Stretch out a hangar, and bend it to the shape you want your brake line to run. Be sure to make wide enough bends. Then use this as a pattern to shape the brake lines. | |
| Torque your spindle nuts properly using a torque wrench. Be sure to repack the bearings and seat them properly. | |
| Use masking tape to see how much to shave off your interfering calipers. Put several layers of masking tape on the caliper if it's rubbing. Install the wheel and spin it. The rubbed off area will show where to sand off some of the metal for clearance. | |
| Bleed your brake lines in back right, back left, front right, front left order. | |
| 10/13/2000: Ruby Red Slippers - the pics above show the Raybestos red brake shoes installed. They were removed shortly after installation because they chattered within the calipers. The tang configuration was such that I couldn't bend them and I could not shim them enough to make them stop. Others installers have noted problems with the Raybestos lifetime warranty shoes. |
![]()
There are many many MANY people out there that have already done this mod. Every one of them ran into something different. Below are some quotes from others. Thanks to all for allowing me to use their knowledge.
| MustangSteve on 10/6/2000, 5:59 pm, Granada Brake Swap for 65-66 Mustang This swap is for the retrofit of later model disc brakes to a 65-66 Mustang (Note that most applies to other later Mustangs through 1970 as well, with a few minor differences) Brakes that will work: - 75-80 Granada and Mercury Monarch - 74 – up Maverick and Comet - Lincoln Versailles front discs are identical to the above, but the lower ball joint has a larger stud, so either skip the spindles from the Versailles or plan on retrofitting your lower ball joint with a much more expensive Versailles lower ball joint. I do not recommend this due to the expense and additional effort involved. First, if you really take your time (assuming access to several wrecking yards) you can find a usable set of brakes that do not need rebuilding. Remember, they get the same price for junk as they do for good stuff. Keep looking until you find a set that has reasonable pad thickness and rotors that are not scored up. If they still have fluid in the system, even better. Prices for a complete disc brake system run about $75 - $100 in reasonable salvage yards. Remove the parts yourself so you see how it all fits. Get all the parts between the ball joints, spindle, caliper, rotor, tie rod ends, etc. Keep the rubber hoses and the steel lines and the brackets that the steel lines attach to the frame with. You will also want the combination/proportioning valve. |
Don't bother trying to unseat the flare nuts holding the tubing to the valve. Just cut the steel lines with some side cutter pliers. It is much easier to get the nuts loose when you get home. Also get the steel lines that have the coil spring around them, even if they have been cut off. The spring is cool to reuse on the new lines you will build, and it is a very effective heat dissipator for the lines in the engine compartment. Don't bother with the master cylinder. Used ones are usually not worth removing, especially if they have no brake fluid in them and are dried out.
The right master cylinder to get (and buy only BRAND NEW unless you like changing out master cylinders regularly) is from a 74 Maverick with NON-Power disc brakes. That one works with either the manual brake system or with the Retrofit Booster Kit mentioned below.
Use the outer donor car’s tie rod ends if still serviceable. If they are not, you will need the outers from a 70 Mustang to fit the new spindles. Bolt the spindles to your existing ball joints (now is a good time for new ones if needed) on your car. Install the new tie rods. (Measure between the center of the inner and outer tie rods existing on the car, then remove the outer one and install the new one, matching the same center to center distance. That will get it good enough to drive it to an alignment shop.
You MUST install the combination/proportioning valve from the Maverick or other 70 & up disc brake equipped Ford product , from a Mustang to a Granada or equivalent, even if you want to install an adjustable proportioning valve. Preferably, get a valve from a car that still has fluid in the brake system. They are prone to leakage when they get dry. If you MUST have that adjustable proportioning valve, then get a differential pressure valve (same as the proportioning valve, except without the proportioning side) from a car or pickup with 4 wheel drum brakes. Both the proportioning valve and the drum type valve have a differential pressure valve in them that is the key ingredient when trying to make your brakes safer. Without it, you gain nothing by installing the dual m/c. The differential pressure valve shuts off flow to any part of the brake system that has a leak, leaving you with either the front or rear operational. Again, the dual piston master cylinder is of no benefit without the differential pressure valve installed.
Now, for the plumbing: The front port on the master cylinder goes to the inlet for the rear brakes on the combination valve. The outlet port from that connection goes to the rear steel brake line going to the rear axle. There is plenty of flex in that steel line to fit the comb. valve directly to it. I usually install the comb. valve vertically right behind the shock tower, bolted to the inner fender. Make the first connection to the rear steel line and then position the comb. valve for “best fit”. All other connections can be made up from that position.
The rear port on the master cylinder goes to any one of the three connections on the other end of the comb. valve, where the three form a “tee”. Since the three ports are just a connection, you can plumb to the easiest port. The other two ports on the tee in the comb. valve go to each of the front brake lines. You will probably have to fabricate some new 3/16” steel lines. You will need a double-inverted-flare flaring set to do this. That is not the same as a household type flare kit you would use for a sink or something. Don’t even think of using brass compression type fittings on a brake line. Be sure to “bench bleed” the master cylinder before installation, then bleed all brakes after installation, starting from the farthest away from the master cylinder and work your way towards it.
Fabrication of steel brake tubing. You will need a double inverted flare kit (about $30, not the same as your dad's old plumbing flare kit. Practice making flares on that scrap tubing I talked you into carrying home.) Use a large socket held in a vise as a guide to form the radii of the tubing. Stretch the tubing as much as you can when bending it around the socket and it won't kink. I make mock-up tubes with lengths of coat hanger wire. Just make the tubing match the shape and length of the mock-up and it will fit just right. OK, now you have it plumbed.
Now for the wheel issue. The outer bearing on the Grenada brake rotor is supported by a larger O.D. chunk of metal than your original wheels will fit over. If you want to use your original black steel wheels, you can have that O.D. turned down on a lathe for about $40 so the wheels will fit. Some wheels will still hit the caliper. If it is easier, just buy the wheels from the Grenade, most were even 6" wide. Most aftermarket wheels fit with no problem. Styled steel wheels from 67-back are more trouble. You will have to machine as above, plus install 1/4" longer wheel studs and install a 1/4" spacer between the wheel and rotor.
You also might have to grind the outer part of the caliper a bit to clear the wheel. Put about 10 layers of masking tape along the top of the caliper and then bolt up the wheel. If it hits, the tape will tell where. Drill some 1/8" holes about 1/16" deep every 3/4" along the area that needs clearance. Then, grind the caliper until the holes disappear. That way, the remaining depth of the drilled holes will tell how much you have ground off. Once it clears the 10 levels of tape, you are on your way.. Keep in mind that the caliper MOVES in and out depending on how much pad is in there...If it just clears with ½ worn pads, it will likely rub when new pads are installed.
Now, if your car has an automatic transmission, and you would really like those cool new brakes to have POWER ASSIST, check out my power brake retrofit conversion for 65-66 Mustangs. You can get to it by going to my web page and clicking on the POWER BRAKE CONVERSION icon. http://www.geocities.com/mustangsteve66/ is the URL for my main page.
........Remember to apply Wilkes’ LAW OF AUTOMOTIVE REPAIR AND RESTORATION…... Any
Automotive Repair Or Restoration Will Take Twice As Long And Cost Twice As Much As Originally Planned, Even After Careful Prior Consideration Of Wilkes’ Law
| Posted by Russ'stang on 10/13/2000, 5:13 pm |
Alright guys, here is the story. My installation of Granada discs was done correctly, thanks to all of you who have given me help and encouragement. The problem was warped rotors and the absence of spring clips for the pads. The mechanic also said that the pads needed to be "seated". I'm not sure exactly what that meant, but I trust this guy, we go back years. The lack of the spring clips and the warped rotors were causing both the shaking while braking and the pedal pulsing up and down. Rear drums were alright all along. None of my brake lines (the ones that I flared....arr, arr, arr!) leaked or were incorrectly installed. He said that he left the rear line reversed on the distribution block because it was working perfectly.....the Russ'stang stops straight and true with much less effort on the part of my right leg. Thank you one and all. My tip, have rotors turned, no matter if they are new or not.
| Steering Stop - Update 12/30/2000 Steve called my attention to a missing piece of information. On the 65s, you have to trim the steering stop bracket to clear the caliper attach bolt. Otherwise, your steering will not turn lock to lock. Click on the thumbnail below to see the steering stop (bolted to the end of the strut rod at the lower control arm) and note how it is cut off to clear the bolt.
|
![]()
There are many many MANY people out there that have web pages on installing Granada brakes. I'm including as many as I know of.... so this can be your 'one stop shop'!
Front Drum to Disc Brake Conversion
for Classic Mustangs
Mustang Plus' Disc
Changeover Tips
Granada
Disc Brake Conversion
From Drum to
Disc Brakes
Tad's
Mustang Shack
Mustang Shop "How
To"
Installing
99-up Mustang GT Dual Piston Aluminum Calipers on Granada Spindles
![]()
When a Mustang is converted to Granada or Maverick disc brakes, sometimes a very distinct rattle is heard when driving the car over even the slightest bumps.
That rattle is caused by the brake pads rattling around in the caliper.
First, the inboard pad:
The inboard pad is held in place by the caliper bracket and has a small piece of spring steel clipped onto one end of it. If the spring is cracked or missing or has lost tension, the pad can move back and forth as much as 1/8”. Be sure the spring is in good condition. It goes on the trailing edge of the pad (towards the back of the car). If yours is missing, you can obtain them from most auto parts stores. All new pads come with the springs, but sometimes they are loose in the box and get lost before you ever buy the pads.
Now for the outboard pad, which is usually the main culprit:
The outboard pad is held to the caliper by a steel tang on the outer part of the pad, one on each end of it. The tangs are designed to clamp tightly around the caliper to hold it tight. They get loose as the tabs are (unknowingly) sometimes widened to ease installation of the pads onto the calipers. If the tangs are not clamped tightly to the caliper, a severe rattle will result. The best fix involves two things. The first is to make sure the tangs are as tight on the caliper as you can possibly get them. The best way to get them that way is to put the caliper with the pad attached into a press or large vise and press the tangs solidly against the caliper. If you don’t want to remove the caliper (and you probably won’t want to ) , you can put the pad in a vise and bend the tabs so they will fit tightly on the caliper. Once you do this, you will find it nearly impossible to get the pads onto the caliper so, before you even try, take a grinder or a file and grind a 1/8” chamfer on the tang to allow it to make it across the sharp edge of the caliper. Make a trial fit to be sure it fits real tight and can not move in the caliper. Now remove the pad once more. Clean the mating surface inside the caliper with some coarse sandpaper or wire brush. Do the same to the part of the pad that rests against the inside of the caliper. Cover the back of the pad with some RTV Ultra Black or high temperature RTV gasket maker. Install the pads back into the calipers, then the assembly onto the spindle before the RTV sets up. Get in the car and push hard on the brake pedal to seat the pads into the RTV and caliper. (Make sure BOTH calipers are installed at the time you hit the pedal or you will be rebuilding the caliper that was not mounted).
Now, go drive the car and heat up the brakes to cure the
RTV and they will never rattle again.
![]()