|
This
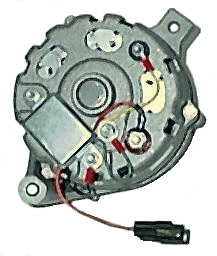
installation is slick. It cleans up the engine bay, puts a solid
state VR in your system, and you can clean up a large amount of
wiring. The unit works well, however you must kick the rpms up to
over 2K to start the alternator charging. No big deal. (It says
above 2K most of the time!) |

|
- Disconnect
battery.
- Add a 10/32 nut on each ground stud on
the back of the alternator.
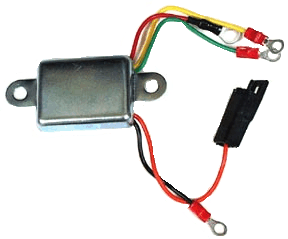
- Connect the black wire to one of
the ground studs. Mount the regulator and secure assembly with 2 more
10/32 nuts.
- Connect the red wire to the large
red insulated terminal labeled " bat ".
- Connect the green wire to the
terminal labeled " fld ".
- Connect the yellow wire to the
terminal labeled " sta ".
- Install alternator on the engine.
- After installing the alternator and one
wire voltage regulator, there is only one wire involved to make the
alternator charge the battery. One 10 gauge wire from the back of the
alternator to the positive side of the starter relay. That is it. The alternator will
now charge.
- If you want to use the in-dash warning
light, it must be connected to the Orange wire on the
new regulator.
- Now the problem is what to do with the
wires on the old generator? Since you don't use the wires, you may remove them or just tape them back. However, if you
want to hook up the warning light, you might want to use one of the existing wires to do
that.
We have found that using the white wire from the field terminal of the
old generator, which is now disconnected can be connected to the Orange wire of the new
regulator. Now all we have to do is find the other end of this white
wire and the wire that leads to the warning light, connect those two ends together and the warning light should function. The other end of the white wire is connected to the FIELD terminal of
the original voltage
regulator. The warning light wire is a small yellow/black wire
connected to the ARMATURE terminal of the old voltage regulator. Disconnect both of these wires
from the old voltage regulator and splice the ends together. The
warning light should now function.
Now, what about the old voltage regulator and the rest of the wires
going to it? The easiest solution is to just leave it in the car as
is. However if you want to remove it, please read on. Again, we
already know that the rest of the wires coming from the old generator
aren't to be used so they can be removed, taped back or left
connected. They can be left connected as there is no current on them.
There are some other wires on the old regulator that would have to be
dealt with if you want to remove the old regulator. The main ones of concern are the 2 wires on
the BATTERY terminal. These are large wires and carry +12 Volts to the ignition switch. If
the old voltage regulator is to be removed, these 2 wires must be spliced together to get the +12V to
the ignition switch. If the old regulator is removed, there may be an issue with the horn
relay wire. Since Ford was inconsistent from year to year with the wiring of the horn relay, you
will have to examine this connection to determine how to resolve it if there is a problem.
- If a warning light is not desired, the
orange wire may be cut off flush with the case of the regulator if
desired.
- Ensure engine block, alternator and
chassis are all grounded properly.
- Reconnect Battery.
- When engine is first started, it may be
necessary to rev the engine beyond idle to turn the warning light off
and initialize the alternator.

|


